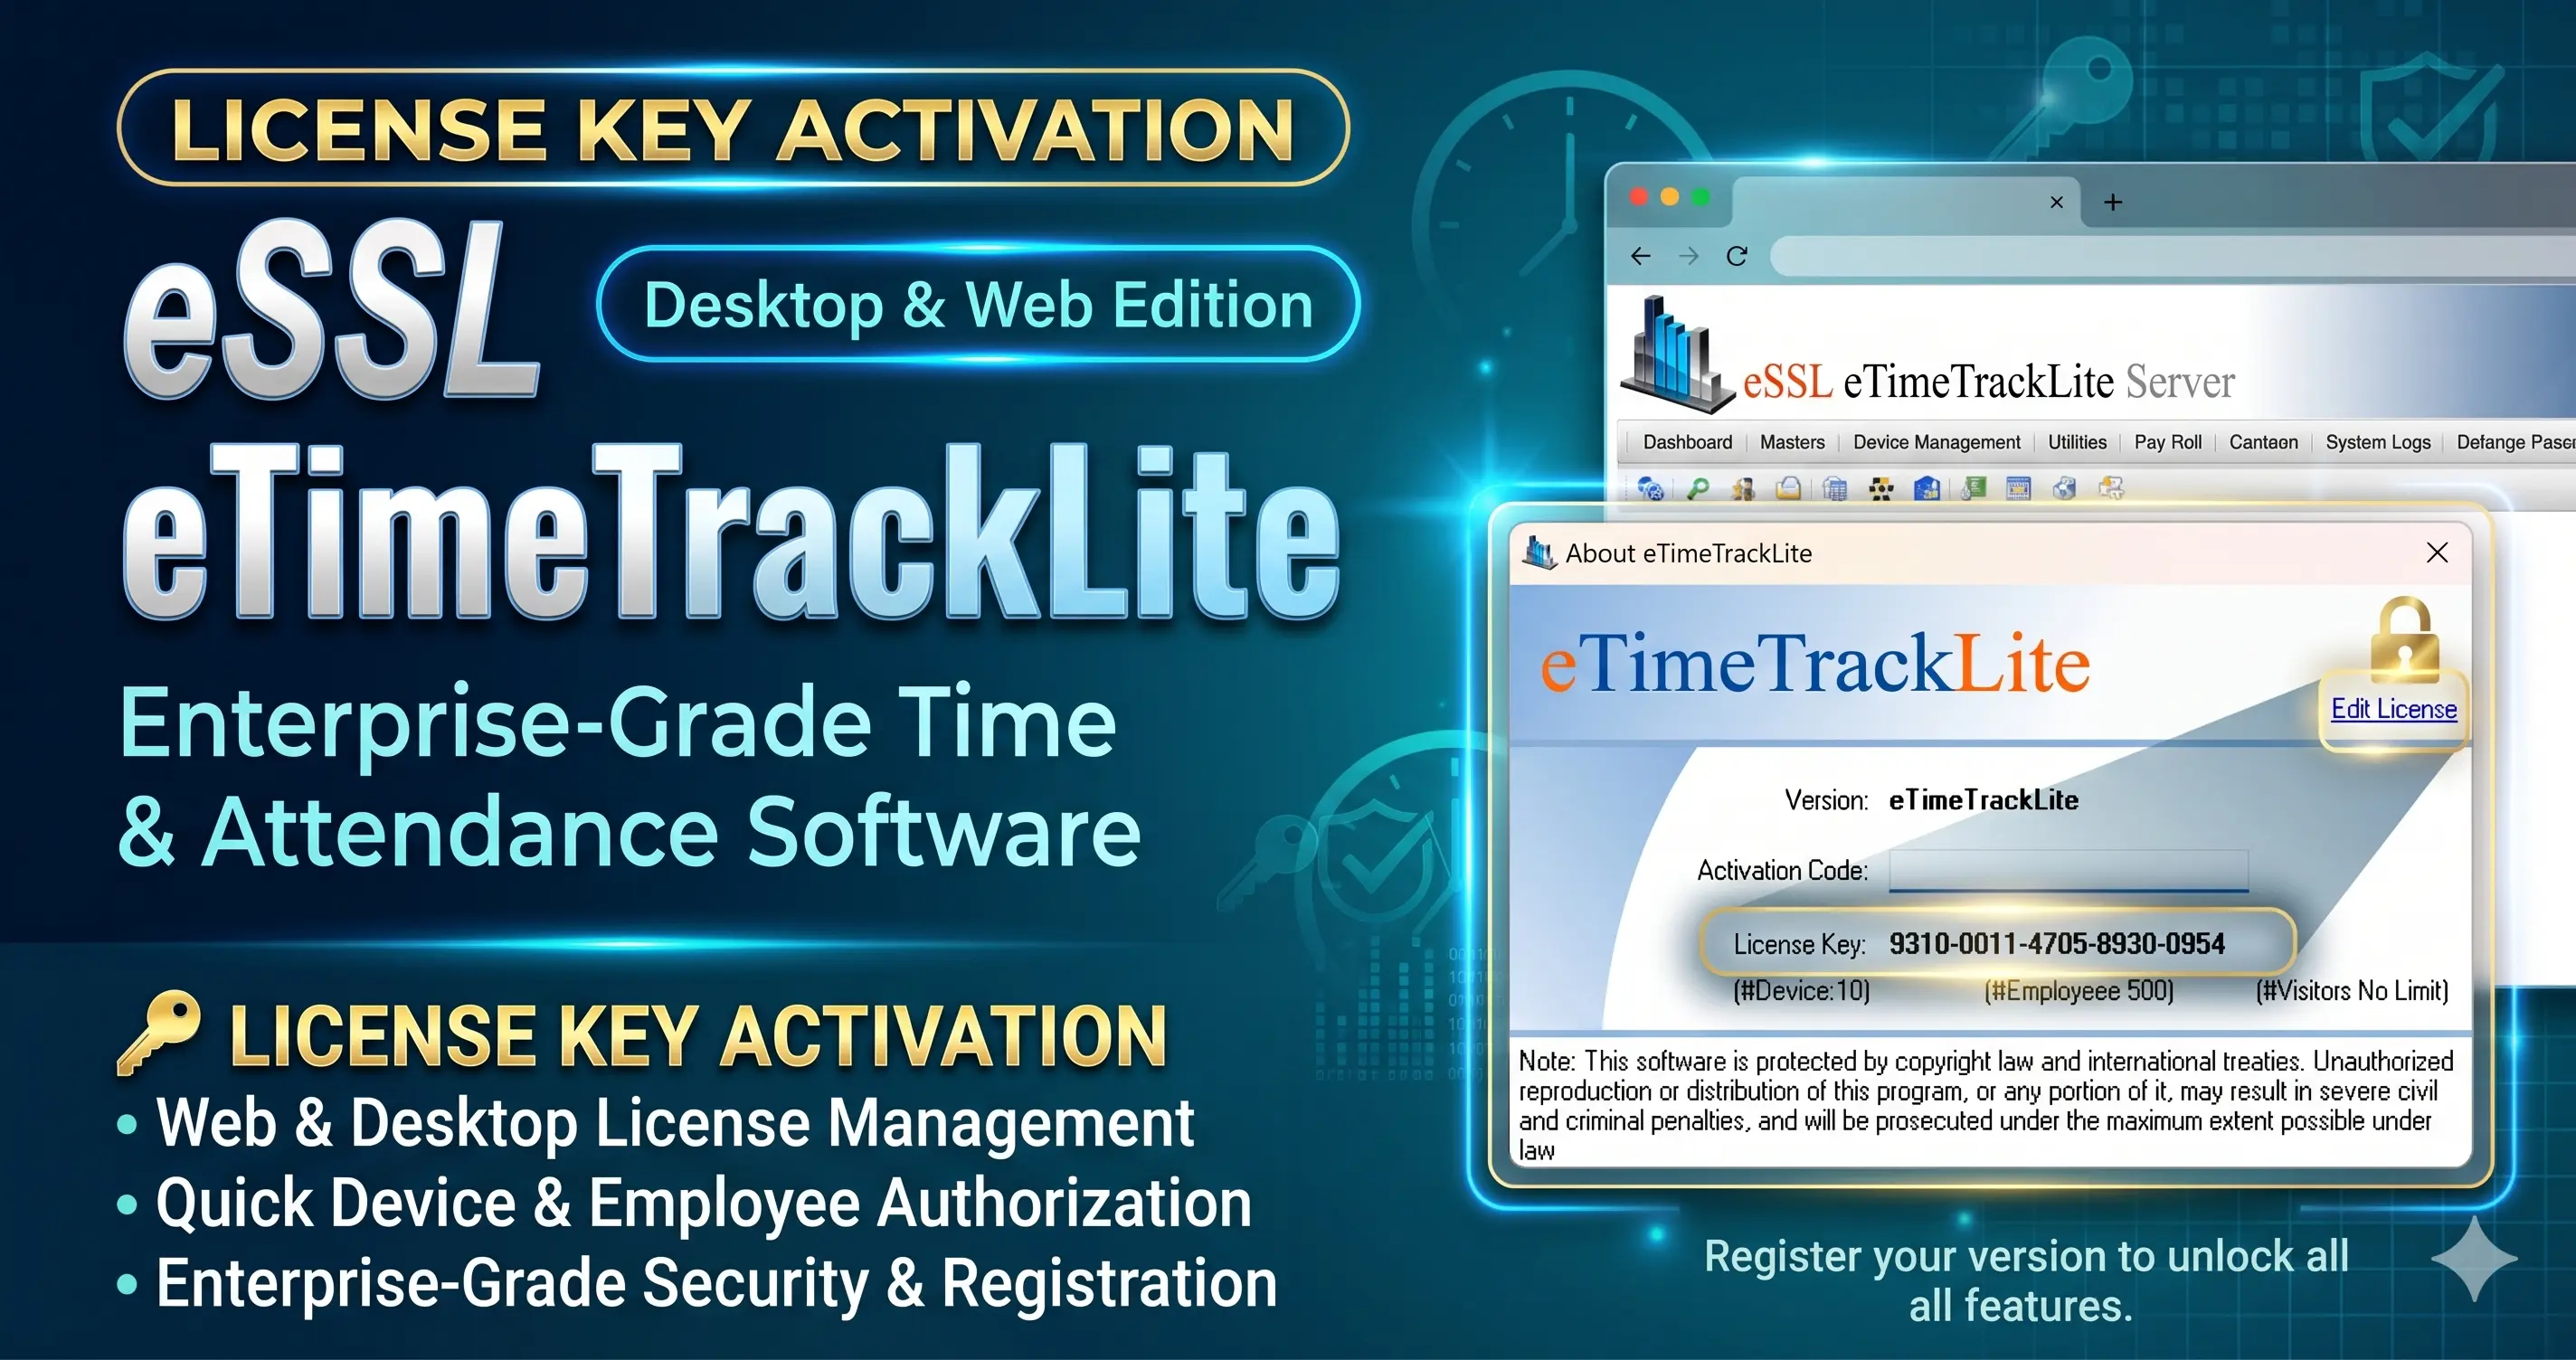
In every office, factory, and commercial institution running eSSL Biometric Attendance Machines, situations inevitably arise where an employee fails to mark their punch. Whether an employee forgot their RFID card, had wet or grease-stained fingers unreadable by the sensor, arrived late due to an approved on-duty (OD) client visit, or experienced a temporary power cut at the biometric terminal—HR administrators frequently need to regularize attendance.
In eSSL eTimeTrackLite Desktop 12.2, manual punch regularization is handled directly through the Device Logs engine. Below is the exact step-by-step procedure our technical engineers train administrators on across Chennai, complete with screenshots and essential report recalculation tips.

Quick Summary of the 5 Steps
- Step 1: Log in to eSSL eTimeTrackLite with administrative privileges.
- Step 2: Click on Masters → Log Records in the top menu bar.
- Step 3: Click the Add button located on the right-hand action column.
- Step 4: Pick the exact Date & Time, select punch Direction (In or Out), enter Approved By, and add Remarks (if any).
- Step 5: Select the target Device, tick the Employee checkbox, and click Add.
Detailed Step-by-Step Instructions
Log In to eSSL eTimeTrackLite Software
Launch the eSSL eTimeTrackLite Desktop 12.2 application from your desktop shortcut or Windows Start Menu. Log in using your designated administrative account.
Default Login Credentials (if unchanged): User Name: essl | Password: essl. If you have misplaced or forgotten your master administrative password, check our guide on eSSL biometric password reset service.
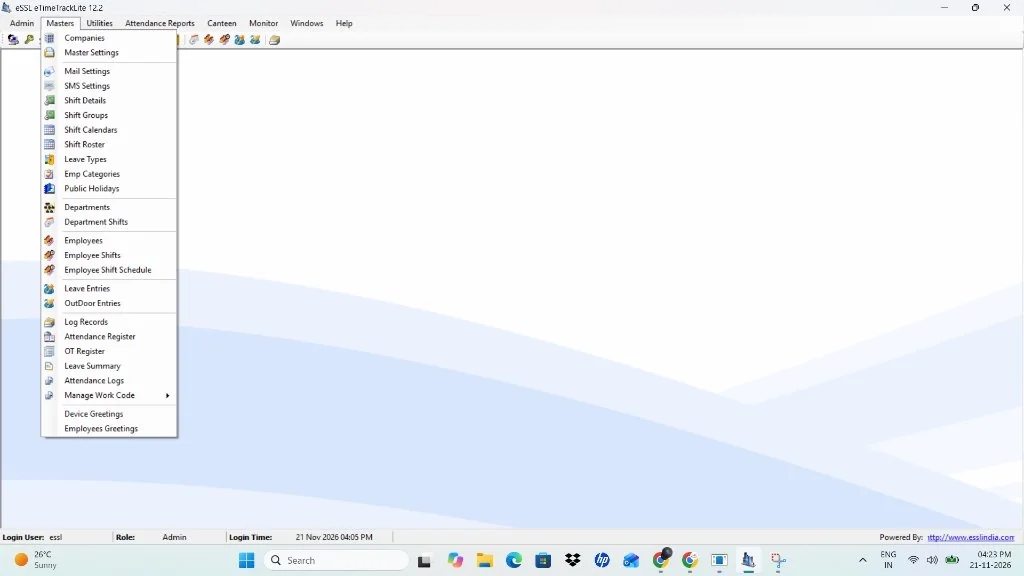
Go to Masters → Log Records
On the top menu bar of eTimeTrackLite, click on the Masters menu dropdown. Scroll through the administrative settings (which include Companies, Master Settings, Shift Details, and Employees) down to the records section.
Click on Log Records (located right below OutDoor Entries).
Click the "Add" Button on the Right Column
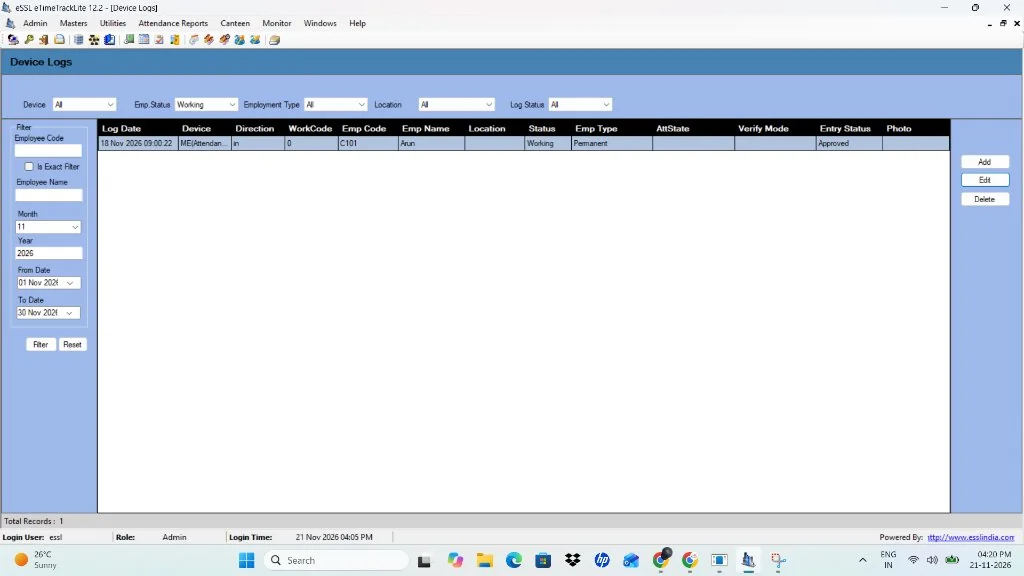
The Device Logs screen will open. Here you can inspect all synced biometric transactions including Log Date, Device name, Punch Direction (In/Out), Employee Code, Employee Name, and Verification Status.
On the far right-hand side of this window, you will see three vertical buttons: Add, Edit, and Delete.
Click the top Add button to open the Add Device Log modal window.
Select Date & Time, Set Direction (In/Out), and Fill Approved By & Remarks (if any)
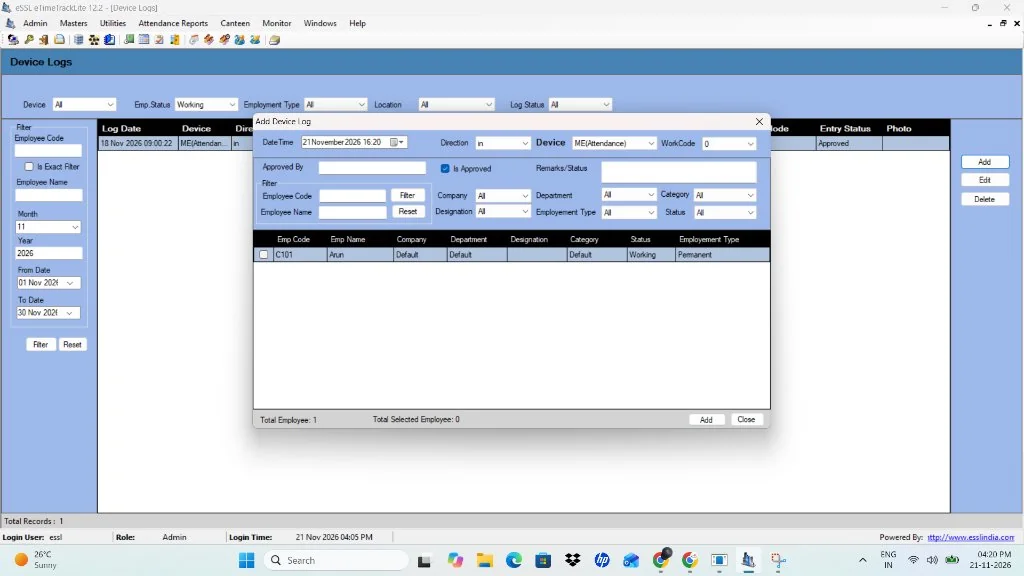
Inside the Add Device Log dialogue box, configure the punch timing, shift direction, and official managerial authorization:
- Date Time: Click the date/time picker dropdown and select the calendar date and the exact hour/minute when the employee reported to duty or departed.
- Direction: Choose either
in(for arrival / start of shift) orout(for departure / end of shift). Attention: Picking the wrong direction will corrupt total daily work duration calculations! - WorkCode: Leave as
0(default) unless your organization tracks job-specific billing work codes. - Approved By: Type the name, employee code, or designation of the authorizing authority (e.g.,
Admin,HR Manager, orArun). This is essential for internal payroll audits and leaves a verifiable management trail. - Is Approved: Ensure this checkbox is checked (ticked by default) so the manual punch is counted toward monthly attendance and payroll calculations.
- Remarks / Status (if any): Enter the specific justification or operational reason for the manual punch (e.g., "Forgot to scan fingerprint at main gate", "RFID Card misplaced", "Official Client Visit OD", or "Device offline / power glitch"). If there are no special notes, you can enter "Manual Regularization" or leave it blank.
Choose Device, Select the Target Employee & Click "Add"
Finally, associate the punch with the correct biometric terminal and employee:
- Device: Select the biometric hardware device from the dropdown (e.g.,
ME(Attendance), Main Gate Reader, Reception Face Scanner). - Filter Employee: If your company has multiple branches or departments, you can filter by Company, Department, Designation, or search directly by Employee Code or Employee Name.
- Tick Employee Checkbox: In the grid below, locate the target employee (e.g.,
C101 - Arun) and check the box in the leftmost column. Notice that the footer indicator updates to "Total Selected Employee: 1". - Click Add: Click the Add button at the bottom-right corner of the dialog. The system will save the record into the database and confirm entry.
- Click Close when finished.
Crucial Final Step: Why Does the Report Still Show "Absent"?
This is the #1 most common support call we receive from HR managers: "I added the manual log entry, but when I open the Monthly Attendance Register or Daily Attendance Report, the employee is still marked Absent!"
Here is why: eTimeTrackLite stores manual entries as raw punches in the database table (DeviceLogs). The software does not automatically re-calculate shift hours in real-time.
- Go to top menu: Attendance Reports → Calculate Attendance.
- Select the From Date and To Date covering the day of the manual entry.
- Select the Department or specific Employee, and click Calculate.
- Once the calculation progress bar reaches 100%, re-open your Attendance Register—the employee will now display as Present with full shift hours!
Manual Log Record vs. OutDoor Entry vs. Leave Entry
Administrators often wonder when to use Manual Log Records versus OutDoor Entries or Leave Entries. Here is the operational distinction:
| Feature / Use Case | Manual Log Record | OutDoor (OD) Entry | Leave Entry |
|---|---|---|---|
| Purpose | Missing punch regularization (forgot scan, card left behind) | Official out-of-office duty, client visit, field work | Approved casual leave, sick leave, paid leave |
| Database Impact | Inserts timestamped punch into DeviceLogs table |
Records OD status without creating artificial clock-in/out stamps | Deducts from employee leave quota balance |
| Shift Timing Required? | Yes (must specify exact In or Out time) | No (marked as Full Day OD or Half Day OD) | No (marked as Full Day or Half Day) |
| Total Work Hours | Calculated mathematically between In and Out punches | Defaults to standard shift duration (e.g., 8 or 9 hours) | 0 work hours (treated as authorized leave) |
Best Practices for Audit-Safe Manual Attendance
- Always Record the 'Approved By' Field: Whenever a manual log is created, enter the initials or name of the authorizing department head or HR officer. This protects against employee disputes during monthly salary disbursements.
- Cross-Check CCTV Footage or Visitor Registers: When employees claim they punched in at 09:00 AM but the machine has no log, check gate security registers or our commercial CCTV camera recordings before regularizing the entry.
- Never Overwrite Existing Correct Punches: If an employee punched In correctly but missed punching Out, only add the single missing "out" punch. Do not add a duplicate "in" punch, as this will register as an in-and-out mismatch.
- Upgrade to SQL Server for Reliable Synchronization: If your eTimeTrackLite crashes or runs slowly during attendance calculations, migrate from MS Access to SQL Server. Read our step-by-step engineering guide: How to Connect eSSL eTimeTrackLite with SQL Server Database.